This strap-check guide works best when the bike, tools, and next step all match the real riding situation instead of a generic checklist. This guide answers the core question quickly, then shows the practical checks that keep how to transport an e-bike on a car rack useful in real life.
Quick answer
Transporting an e-bike on a car rack is easier when you confirm fit first, handle the heaviest or most failure-prone parts before you leave, and re-check the setup after the first short stretch instead of assuming it stayed perfect.
Transport safety checklist
| Step | Why it matters | Best time to check |
|---|---|---|
| Car-Rack Weight Checks for an E-Bike | Start by confirming the rack, hitch, and tray limits against the full riding weight of the bike. Removing the battery and loose cargo often | Review before every ride |
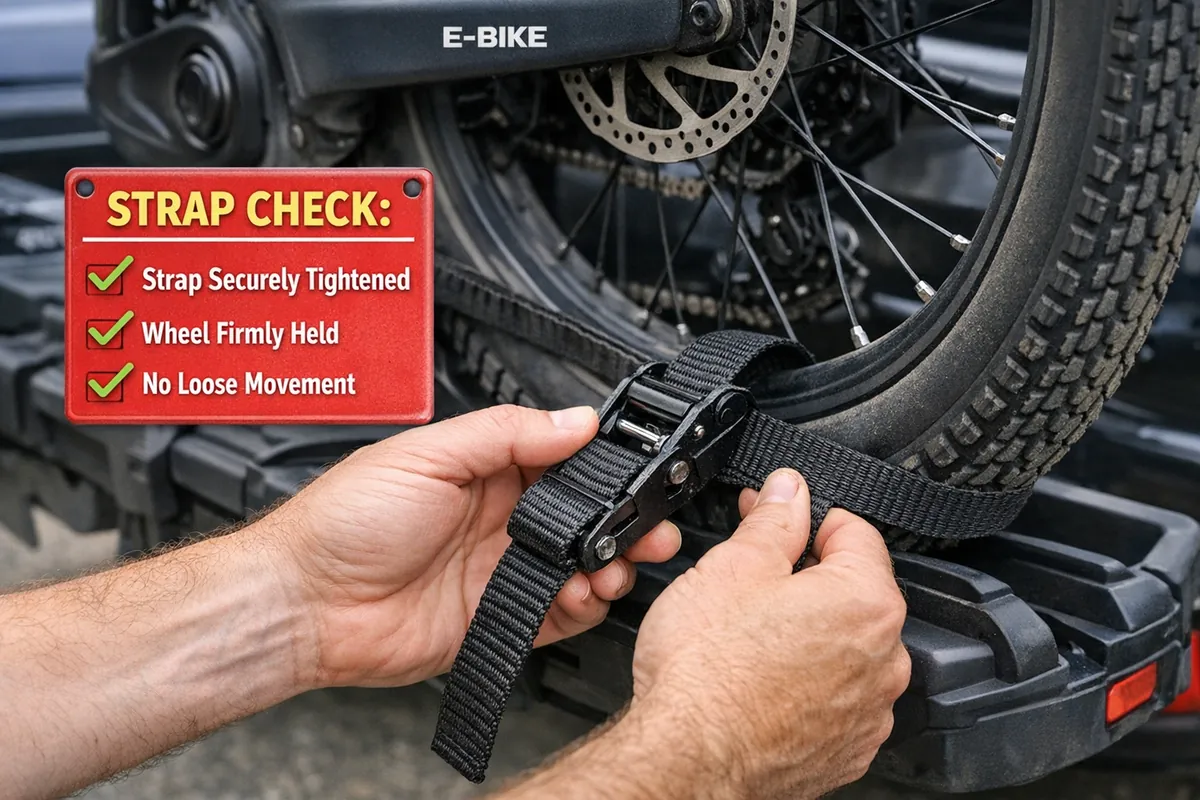
| Protect the Frame on an E-Bike Car Rack | Use frame-safe contact points, add a secondary strap, and keep brake hoses, fenders, and display wires away from abrasive tie-down angles. A | Use during setup |
| Common Car Rack Mistakes That Put an E-Bike at Risk | Trouble usually comes from trusting a generic bike-rack rating, ignoring wheelbase fit, or letting the bike bounce against metal trays. If t | Use during setup |
Start by confirming the rack, hitch, and tray limits against the full riding weight of the bike. Removing the battery and loose cargo often creates the safety margin that makes the setup workable without stressing clamps or trays.
In practice, this part matters because an e-bike car-rack setup usually fails when riders skip a simple fit or inspection step. Work slowly enough to notice contact points, hardware access, and whether the setup still feels repeatable when you are tired, parked on uneven ground, or trying to finish the job quickly.
Takeaway: keep this step simple enough that you would trust yourself to repeat it without guesswork during normal safe transport and loading decisions.
Use frame-safe contact points, add a secondary strap, and keep brake hoses, fenders, and display wires away from abrasive tie-down angles. A slow first stop to re-check tension catches most real-world loading mistakes before they become expensive damage.
In practice, this part matters because an e-bike car-rack setup usually fails when riders skip a simple fit or inspection step. Work slowly enough to notice contact points, hardware access, and whether the setup still feels repeatable when you are tired, parked on uneven ground, or trying to finish the job quickly.
Takeaway: keep this step simple enough that you would trust yourself to repeat it without guesswork during normal safe transport and loading decisions.
Trouble usually comes from trusting a generic bike-rack rating, ignoring wheelbase fit, or letting the bike bounce against metal trays. If the lift feels awkward, a ramp or second person is safer than forcing the bike onto the rack alone.
In practice, this part matters because an e-bike car-rack setup usually fails when riders skip a simple fit or inspection step. Work slowly enough to notice contact points, hardware access, and whether the setup still feels repeatable when you are tired, parked on uneven ground, or trying to finish the job quickly.
Takeaway: keep this step simple enough that you would trust yourself to repeat it without guesswork during normal safe transport and loading decisions.
Practical callout: If any part of the e-bike car-rack setup feels awkward, heavy, or improvised, pause and fix the setup before continuing. That small reset usually prevents the frame damage, roadside delay, or safety mistake that turns a simple job into a bigger problem.
For broader background, review this supporting reference and this additional safety source.


